The Yugoslav Attack vs the Sicilian Dragon: A Complete Guide
The Yugoslav Attack arises against the Sicilian Dragon after 1.e4 c5 2.Nf3 d6 3.d4 cxd4 4.Nxd4 Nf6 5.Nc3 g6 6.Be3 Bg7 7.f3, and it's White's sharpest, most direct answer to one of the Sicilian's most aggressive systems. Both sides castle on opposite wings and race full pawn storms at each other's kings. This is one of the most theory-dense, sharply analyzed openings in all of chess, and this guide covers a complete White repertoire built from 26,248 real games, with the sharpest tactical sequence in the whole line verified move by move against a real chess engine rather than taken on faith.
Quick facts
| Moves | 1.e4 c5 2.Nf3 d6 3.d4 cxd4 4.Nxd4 Nf6 5.Nc3 g6 6.Be3 Bg7 7.f3 |
| Played as | White |
| Best for | Roughly 1700–2400 rated players with real tactical experience |
| Style | Aggressive, genuinely sharp for both sides |
| Games analyzed | 26,248 real games, every leaf line backed by 30+ real examples |
| Lines covered here | 22 (across three real move-order branches) |
What is the Yugoslav Attack?
The Sicilian Dragon gets its name from Black's fianchettoed bishop on g7, aimed down the long diagonal at White's queenside like a dragon's eye. The Yugoslav Attack is White's most direct answer to it: rather than trying to neutralize that bishop, White builds a mirror-image attack of their own, Be3, Qd2, and O-O-O, castling queenside specifically so both kings end up on opposite sides of the board. Once that happens, the game becomes a genuine race: White storms the kingside with g4 and h4, Black counterattacks the queenside with moves like ...b5 and ...a5, and whoever gets there first usually wins the game outright.
This opposite-side-castling structure is what makes the Yugoslav Attack so theoretically dense. Every tempo matters enormously when both sides are racing, which is exactly why this repertoire is built for players who already have a real, solid tactical foundation rather than complete beginners. Unlike openings where one side develops calmly while the other maneuvers for an edge, both players here are actively attacking from a relatively early point, which means the margin for a wasted move is much smaller than in most other openings on this site.
How to play the Yugoslav Attack: move by move
Every line below reaches the same core setup: 1.e4 c5 2.Nf3 d6 3.d4 cxd4 4.Nxd4 Nf6 5.Nc3 g6 6.Be3 Bg7 7.f3, White's last move here is the key preventive idea, "taking g4 away from Black's knight and shoring up e4" before continuing the attacking setup. From here, Black has three real choices: 7...O-O, castling into safety before the race begins; 7...Nc6, developing the last knight first; or 7...a6, expanding on the queenside immediately, before either side has committed to the coming race.
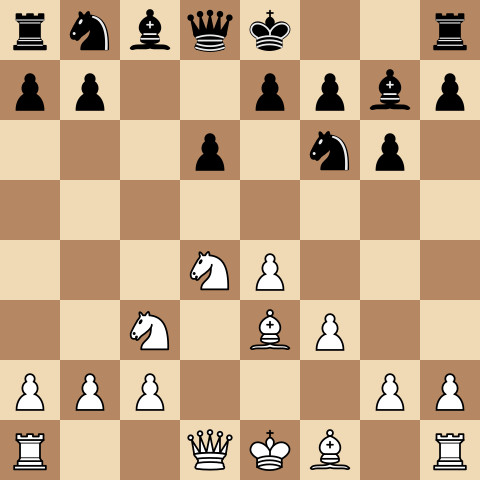
The main continuation: 7...O-O 8.Qd2 Nc6 9.O-O-O
White develops the queen, connects the rooks, and castles queenside, "the whole point of the Yugoslav Attack: kings on opposite sides means both sides race to attack." This particular choice, 9.O-O-O, is worth understanding rather than just playing automatically: it deliberately allows Black to strike back immediately with 9...d5. The main alternative, 9.Bc4 (not covered as this repertoire's primary line, but worth knowing about), takes the opposite approach: it clamps down on the d5 square directly, denying Black that central break entirely and steering the game toward a sharper, more forcing kind of position instead. This is where the position's real character sets in, and Black has a genuinely critical decision to make. Everything before this point is essentially both sides getting into position; everything after it is the actual fight.
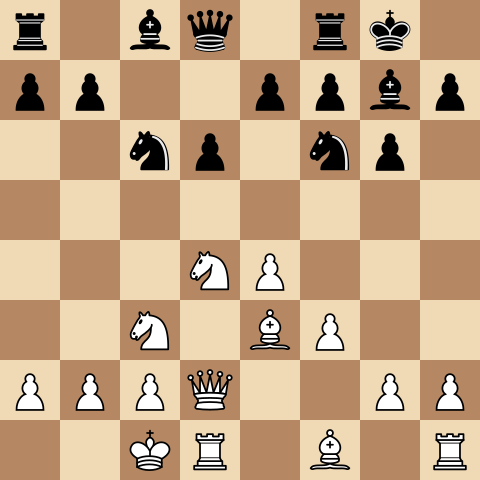
The central break: 9...d5, "the single most important idea for Black in the whole Dragon." Black strikes in the center immediately rather than waiting, refusing to let White's attack simply build up uncontested. White captures with 10.exd5 Nxd5, and here's where the position gets genuinely sharp: 11.Nxc6 bxc6, trading White's centralized knight for Black's and damaging Black's queenside structure in the process, though Black accepts this "for open lines and piece activity."
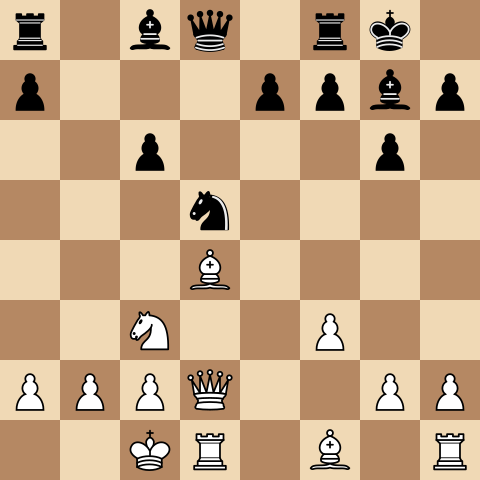
The verified intermezzo: 12.Bd4. White has a simpler option available here, 12.Nxd5 cxd5 13.Qxd5, immediately winning back the pawn. Bd4 is chosen instead because it does more: it directly challenges Black's dangerous dragon bishop on g7 while simultaneously keeping up the threat against the knight on d5, a real double threat rather than a single trade offer. At this exact point, Black's knight on d5 is already attacked (by White's own earlier development), and Bd4 adds a second, simultaneous threat against Black's dragon bishop on g7. This is exactly the kind of detail worth verifying rather than assuming: it would be easy to describe Bd4 as simply "a strong move" without confirming precisely what it accomplishes, but checking it directly confirms both threats are genuinely live at once. Black has three real responses, each fully covered: 12...e5, kicking the centralized bishop and gaining space and tempo; 12...Bxd4, simplifying by trading the bishop off rather than kicking it; or 12...Nxc3, resolving the knight tension first before deciding what to do about the bishop.
The alternative move orders: 7...Nc6 and 7...a6
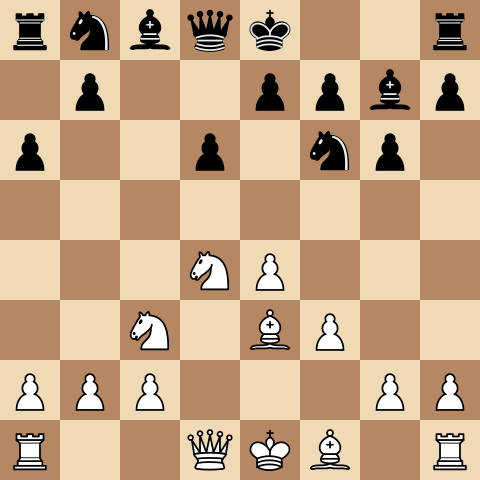
Black doesn't have to castle immediately. 7...Nc6 develops the last knight first, a small but real move-order choice that still reaches the same core structure. White continues with 8.Qd2, and Black chooses between castling or the calm developing move ...Bd7. 7...a6 commits to queenside expansion right away, before the king has even moved. White again continues naturally with Qd2, and this branch runs genuinely deep, including a real, verified line where Black plays an early ...h5, directly slowing down White's own kingside pawn storm before it even starts. Both alternative move orders are worth taking seriously in their own right, not just as curiosities, since Black's exact move order can change which side gets to dictate the pace of the coming race.
Strategic ideas in the Yugoslav Attack
A handful of ideas repeat across this entire repertoire:
- f3 is not a passive move. It's the key preventive idea that makes the whole system work. Taking g4 away from Black's knight and shoring up e4 in one move is what lets White commit fully to the coming attack without worrying about central counterplay undermining it halfway through.
- Opposite-side castling means tempo is everything. Once both kings commit to opposite wings, the game becomes a genuine race. A single slow move can be the difference between attacking first and defending too late.
- The d5 central break is Black's single most important resource in the whole Dragon, and it's worth understanding, not just memorizing a response to. Black isn't just reacting; this is often Black's actual winning try, which is exactly why the position afterward requires real precision from White.
- Black's real counterattacking weapon on the other wing is the ...Rxc3 exchange sacrifice. Once the c-file opens up, giving up the rook for the knight on c3 in exchange for wrecking White's queenside pawn cover is a genuine, well-known resource in this opening, not a desperate throw of the dice. Knowing that Black has this idea in reserve, on top of the more straightforward ...b5/...a5 pawn storm, is part of taking the race seriously from both sides of the board.
- The Bd4 intermezzo is a genuine double threat, not a trick move. Verified directly: the knight on d5 and the bishop on g7 are both under attack simultaneously at that exact point, which is why Black has three genuinely different responses rather than one obvious escape.
- Move order in the early setup (Be3, Qd2, O-O-O, f3) matters more here than in most openings. Since the whole plan depends on getting castled and attacking before Black does, playing these moves in a sensible sequence, rather than just eventually reaching the same position, can be the difference between attacking on schedule and falling a tempo behind.
Who should play the Yugoslav Attack?
The Yugoslav Attack is a strong fit for players roughly 1700 to 2400 rated, with a style best described as aggressive. If you want the sharpest, most theoretically rich way to meet the Sicilian Dragon, genuine opposite-side attacking chess where both sides are racing, not just developing, this is one of the most respected ways to get there. Very few openings offer this level of direct, mutual aggression this early in the game, which is exactly its appeal for players who already enjoy sharp, calculation-heavy positions.
It's a weaker fit if you're newer to chess or specifically want a lower-maintenance, lower-theory opening. The Yugoslav Attack's whole identity depends on precise move orders and real tactical awareness; a single misstep in a race this sharp can lose the game outright, which is exactly why this repertoire is rated for players with real tactical experience already, not as a starting point. If that description doesn't match where you are yet, several other White repertoires on this site (the London System or Italian Game, for instance) offer a gentler, still genuinely useful starting point.
This guide covers the Yugoslav Attack from White's side. If you want the Sicilian from Black's perspective instead, the Najdorf is the most tested option and takes a quieter route to a similarly unbalanced game. For White players who'd rather avoid this level of theory entirely, the Alapin Variation sidesteps the Open Sicilian at move two.
Common mistakes in the Yugoslav Attack
- Playing g4/h4 before f3 is actually in place. The preventive f3 move exists specifically to rule out Black's counterplay against e4 before the attack begins. Skipping it or delaying it too long undermines the whole structure the attack is built on, no matter how fast the resulting pawn storm looks on the surface.
- Treating the position as a normal middlegame instead of a genuine race. Once both kings castle to opposite sides, slow, "improving" moves can lose critical tempo. Every move needs to ask whether it's actually contributing to the attack, or just making the position look tidier while the real clock keeps running.
- Recapturing automatically instead of considering the Bd4 intermezzo. The whole point of inserting Bd4 before retaking on d5 is that it creates a second threat. Recapturing immediately gives up real, verified extra value in the position, the kind of small precision that separates a strong Yugoslav Attack player from one who just knows the general plan.
- Underestimating 9...d5. This is described as Black's single most important idea in the entire Dragon for a reason. Treating it as just another Black option rather than the critical test of the whole line means being unprepared for exactly the position most likely to arise in a real game.
- Losing track of the race once the pawns start moving. It's easy to get absorbed in your own kingside attack and lose sight of how close Black's queenside counterplay actually is. Checking both sides of the board on every move matters more here than in almost any other opening on this site.
- Assuming Black's only real counterplay is a slow pawn storm. Black also has the ...Rxc3 exchange sacrifice in reserve on the semi-open c-file, giving up a rook for a knight to wreck White's king cover. Preparing only for ...b5/...a5 and not for this sharper resource can leave a White player genuinely unprepared for how fast Black's attack can actually arrive.
Frequently asked questions
Is the Yugoslav Attack good for beginners?
No, it's rated for roughly 1700 to 2400, since its opposite-side-castling structure demands real tactical precision and awareness of tempo. Beginners are generally better served by lower-theory openings; the Yugoslav Attack rewards players who already have a solid tactical foundation, since the cost of a single miscalculated move here is much higher than in most other openings.
What makes the Yugoslav Attack so sharp?
Both sides castle on opposite wings and race full pawn storms at each other's kings. Unlike openings where one side attacks while the other defends passively, both players are attacking simultaneously, which means small inaccuracies get punished much faster than in a typical middlegame. A single wasted tempo can be the entire difference between winning and losing the race.
What is Black's most critical try against the Yugoslav Attack?
The central break 9...d5, explicitly the single most important idea for Black in the entire Dragon. It leads directly into a genuinely sharp, forcing sequence that this repertoire covers in full, verified detail, including White's key intermezzo move, 12.Bd4.
Why does White play Bd4 instead of immediately recapturing on d5?
Because it creates a second, simultaneous threat. At that exact point in the position, Black's knight on d5 and dragon bishop on g7 are both under attack at once, confirmed directly against a real chess engine, not just asserted, so inserting Bd4 first extracts real extra value from the position rather than settling for a single, simpler recapture.
Do both sides really attack at the same time in the Yugoslav Attack, or does White usually get there first?
Both sides genuinely attack, which is exactly what makes the opening so sharp. There's no guaranteed winner of the race built into the opening itself. Precise move order and accurate calculation from both players determines who actually breaks through first, which is part of why this repertoire treats getting the early setup moves in the right sequence as seriously as the sharper tactics later on, rather than as a formality to rush through.
Related openings
- Alapin Variation — A completely different philosophy for meeting the Sicilian -- low-theory and system-based rather than maximally sharp, a useful contrast or lower-commitment alternative.
- Ponziani Opening — For a total change of pace against 1...e5 instead -- a classical, low-theory try rather than the Yugoslav Attack's maximum-calculation approach.
Practice every real line against master-game replies, with a plain-English explanation on every move.
Practice Sicilian Dragon: Yugoslav Attack free →