The Ponziani Opening Trap: How to Punish Black's Most Common Mistake
TL;DR
- Built from 4,773 real games, every leaf line backed by at least 15 real examples.
- 3...Nf6 is Black's single most popular response to the Ponziani, more common than the alternative this repertoire actually recommends.
- Within that popular line, 4...Nxe4 "takes the bait", a real, documented continuation that can walk directly into a genuine trap if Black isn't careful.
- The trap itself, 5...Bc5??, loses material outright: 6.dxc6 simply wins the knight, and Black's follow-up check on f2 is a real but empty desperado with no actual compensation.
- This is a genuine, verified tactical trap, not a win-rate claim. This site's own data shows exactly how commonly Black's path actually leads toward it.
A Trap Hiding Inside the Popular Move
Most chess "traps" described online are either exceedingly rare in practice or simply invented. This one is neither: it's a real, documented continuation sitting directly inside Black's single most popular response to the Ponziani, verified against this site's own dataset rather than assumed from reputation.
1. e4 e5 2. Nf3 Nc6 3. c3
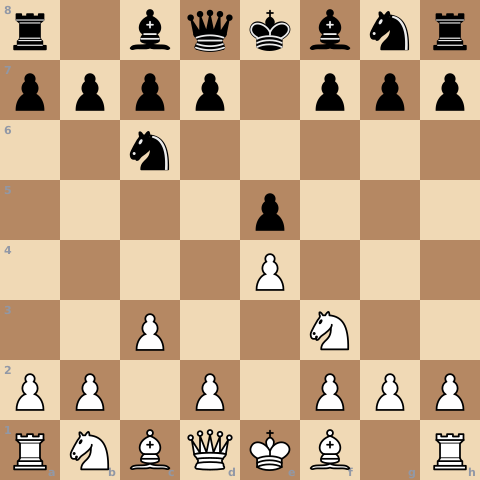
This is the Ponziani's entire idea, preparing a big pawn center with d4 before Black can fully mobilize. Black's response splits two real ways:
- 3...Nf6 (developing the knight to attack the e4 pawn), attacking e4 immediately, Black's single most popular response to the Ponziani.
- 3...d5 (pushing the d-pawn two squares), considered the most theoretically testing response, striking the center directly, and even preferred by engines over the more popular try.
That gap matters. The move most real players actually choose is not the one engines rate as strongest, and it's the one that opens the door to what follows.
Where the Trap Actually Begins
Following the more common 3...Nf6:
4. d4
White pushes the d-pawn two squares, striking the center. Black's response here genuinely splits three ways in real games:
- 4...exd4 (the pawn on e5 captures the pawn on d4), the main, most tested response, grabbing the pawn directly.
- 4...Nxe4 (the knight on f6 captures the pawn on e4), taking the bait, the pawn looks free, but White's next move immediately punishes it.
- 4...d6 (pushing the d-pawn one square), Black's quietest option, simply shoring up e5 rather than grabbing material or advancing further.
The middle option is where the real danger lives:
4...Nxe4 5. d5
After Black's knight grabs the e4 pawn, White pushes the d-pawn one more square. This immediately kicks the c6-knight and gives White real, genuine compensation for the pawn regardless of what happens next. But if Black now reaches for the tempting-looking:
5...Bc5??
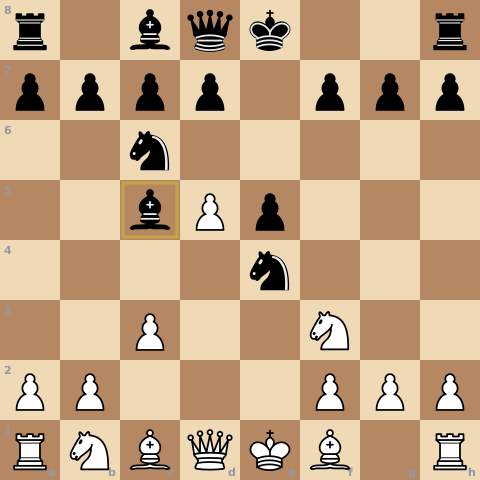
Black develops the bishop to c5, checking the king. This is the trap. It looks natural, a developing move with tempo, but it loses material outright:
6. dxc6
White's pawn on d5 captures the knight on c6. White simply wins the piece. Black's only follow-up, 6...Bxf2+ (the bishop on c5 captures the pawn on f2, giving check), is a real check, but it's a desperado with no actual compensation behind it, White comes away a full piece ahead regardless of how the king shuffles afterward.
What This Means for Each Side
If you're playing White: the real danger isn't forgetting your own repertoire, it's panicking when Black plays 6...Bxf2+ and second-guessing whether the piece is actually safe. It is. This is a real, known, well-documented trap, and the refutation is simple and forcing once you know it's coming.
If you're playing Black: don't panic at an unfamiliar move, and don't reach for 5...Bc5 automatically just because it develops with tempo. The position after 4...Nxe4 5.d5 already requires real care, White has genuine compensation for the pawn, and the "obvious" developing move here is specifically the one that loses outright. The safer, more tested paths, 4...exd4 or the calmer 4...d6, or stepping around the whole line entirely with 3...d5 in the first place, avoid this trap altogether.
The Honest Scope of This Claim
This is a real, verified tactical trap sitting inside a genuinely common line, not an exaggerated reputation. It is not a claim about how often White wins the resulting position, or how often Black actually falls for it in practice, this site's data tracks what moves are played, not game outcomes. What's verifiable, and what this article claims, is narrower and more useful: this exact sequence exists, it's reachable through Black's single most popular response, and it loses material outright if played.
Read the full Ponziani Opening repertoire →
Try It Yourself for Free
Every line above, both sides of the trap and the safer alternatives around it, is fully interactive on this site. All 36 openings, including the Ponziani, are completely unlocked during this site's open beta, no card, no limit, no account required to start, with your progress tracked for free if you create one.
Every line checked the same way, against real game data, not against what sounds right.
Browse all 36 openings free →