How to Play the Caro-Kann Advance as Black
The Caro-Kann Advance Variation arises after 1.e4 c6 2.d4 d5 3.e5, and it's one of the most respected, reliable ways for Black to meet 1.e4 without walking into the sharpest theoretical battles other defenses invite. This guide covers a complete Black repertoire against it, built from 61,922 real master games, answering all four of White's genuinely common approaches with one coherent, engine-verified plan.
Quick facts
| Moves | 1.e4 c6 2.d4 d5 3.e5 Bf5 |
| Played as | Black |
| Best for | Roughly 800–2000 rated players |
| Style | Solid, positional |
| Games analyzed | 61,922 real master games |
| Lines covered here | 28 (across 4 real White systems) |
What is the Caro-Kann Advance Variation?
The Caro-Kann begins with 1...c6, a quiet-looking move that's actually doing real work: it prepares ...d5, striking the center, with a pawn that isn't easy for White to challenge the way ...d5 can be challenged after other first moves. When White responds to ...d5 with 3.e5, the Advance Variation, White claims extra space and asks an immediate question of Black's dark-squared bishop, which needs to get out before the position closes in around it.
The answer, and the single most important move in this entire opening, is 3...Bf5. Getting the bishop outside the pawn chain before playing ...e6 solves the one structural problem every French-Defense-style ...e6 setup runs into: a bishop trapped behind its own pawns for the rest of the game. This is exactly why the Caro-Kann has a reputation as one of the safest, most "problem-free" ways to meet 1.e4. Black solves the position's one real structural issue in a single move, then spends the rest of the game developing normally, without the position ever forcing an awkward compromise the way it can in some other, more theory-heavy responses to 1.e4.
The repertoire here is built around this same 3...Bf5 approach specifically, since it's the choice in roughly three out of every four real games at this position (the alternative, 3...c5, is a real, playable "Modern Variation," but a repertoire needs one coherent identity rather than teaching two different structures against the same position, splitting attention between two separate plans tends to leave a player half-prepared for both rather than genuinely fluent in either).
How to play the Caro-Kann Advance: move by move
After 1.e4 c6 2.d4 d5 3.e5 Bf5, White has four genuinely distinct, real systems in the data, and this repertoire answers all four with the same reliable, well-tested plan.
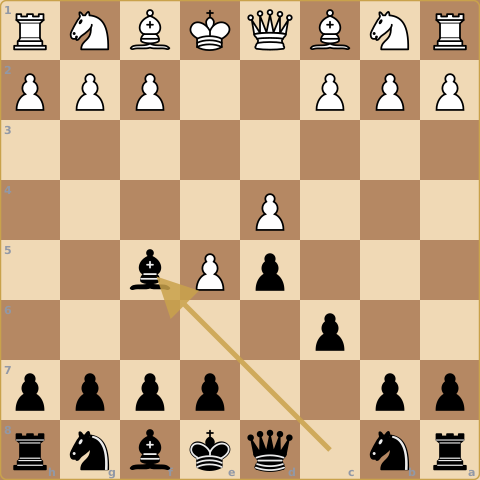
System 1: The Short Variation, 4.Nf3
The most straightforward response, White simply develops without immediately challenging the bishop the way some sharper tries do. Black continues naturally with ...e6, ...Nd7, and ...Ne7 (or a similar developing sequence), reaching a comfortable, well-supported position. From here, White's follow-up varies (Nbd2, Nh4, c3, or Bg5 all show up with real frequency in the data), but Black's own plan barely changes regardless. That's exactly the point of a repertoire built around one coherent structure rather than reacting to every White try separately. Worth noting specifically: even in this quieter system, White can still try Nh4, aiming to trade off Black's important light-squared bishop. The same underlying theme (protect that bishop) shows up again here, just later and more subtly than in the direct h4 push of System 2.
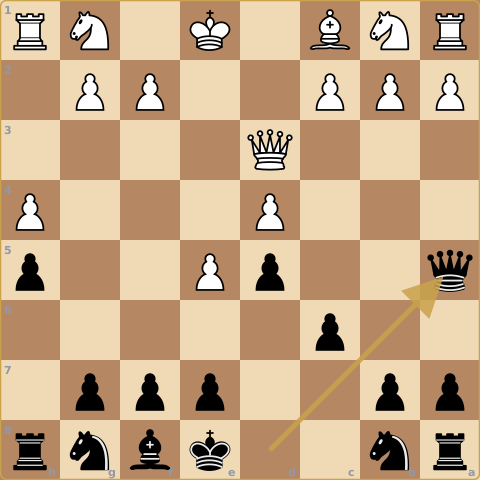
System 2: The Tal Variation, 4.h4
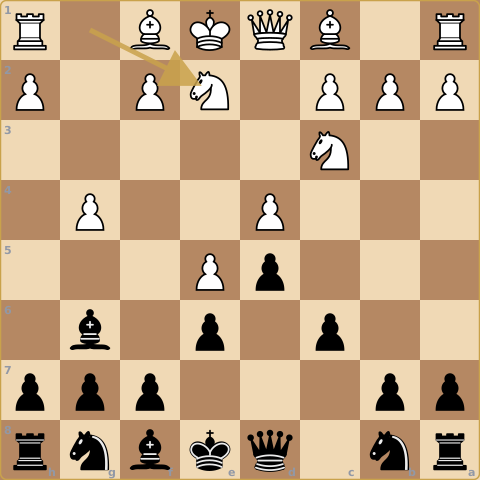
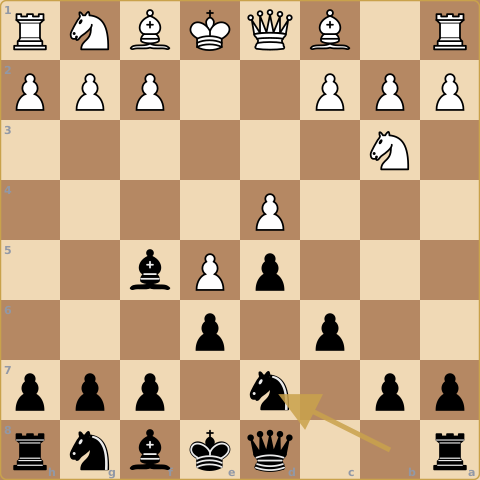
White's most ambitious try against the bishop: h4 directly threatens h5, physically attacking the bishop on f5 and forcing an immediate decision. Black meets this with ...h5 in return, stopping h5 from ever being played and keeping the bishop safely on its best square. The critical continuation runs 5.Bd3, offering a trade of light-squared bishops, and after ...Bxd3 6.Qxd3 Qa5+, Black's queen strikes out actively and gives check along the a5-e1 diagonal at the same time, one of the deepest, most thoroughly tested lines in the whole repertoire. The check forces White to interpose, and this repertoire covers all three real ways to do it: Nd2 or Bd2, both quiet blocks on the same diagonal, or the sharper 7.b4!?. That last one is not simply a tempo-gaining space grab. It's a genuine interposing pawn sacrifice, blocking the check on b4 while offering the pawn there (it's entirely undefended) in exchange for faster development down the open b-file. It looks alarming the first time you see it, but it's a fully covered, verified continuation here, not a surprise you're left to work out over the board.
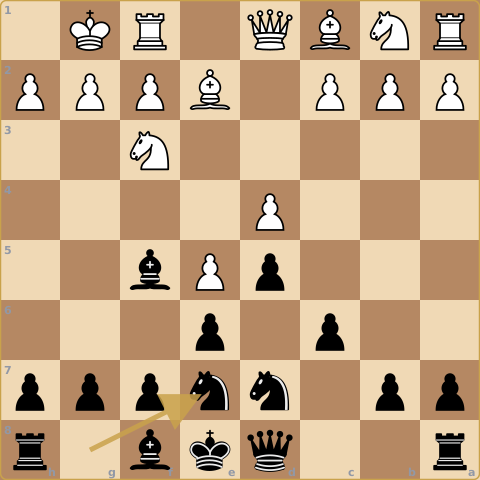
System 3: The Shirov Attack, 4.Nc3
Rather than developing quietly, White keeps options flexible and often follows up with the most aggressive plan available against this bishop: g4, physically kicking it, followed by Nge2, developing toward f4 to aim a knight at the bishop's new square on g6. Black's response, ...e6 first, then meeting g4 with ...Bg6, tucking the bishop safely out of the way while keeping the long-term plan of ...c5 in reserve, is the sharpest, most tactically alive branch in this entire repertoire.
Once Black strikes back with ...c5, White has two real, verified tries in the data: a second wave of aggression with 7.h4 (again eyeing the bishop, this time on g6), or the quieter Be3, simply adding support to the center instead. Against the aggressive try, Black's precise answer is 7...h5!, stopping White's h-pawn in its tracks before it can advance any further and create new threats against the bishop. White typically continues with 8.Nf4, eyeing d5 and g6, so h5 doesn't shut down every White idea in this position, but it does take the specific pawn-storm threat off the table for good. This whole sequence is fully covered and verified rather than left as a surprise.
System 4: The quiet setup, 4.Nd2
A flexible, lower-key developing move that keeps other pawns free to advance later. Black responds with the same natural developing plan (...e6, ...Nd7, heading toward ...Ne7 or ...Ngf6), reaching comfortable, well-tested positions with real depth in the data. One line runs 11 moves deep into a fully mirrored development race with both sides completely safe.
Strategic ideas in the Caro-Kann Advance
A handful of ideas recur across all four of White's systems, since Black's underlying plan barely changes regardless of what White tries in response:
- Get the bishop out before ...e6, every time. This is the single non-negotiable principle of the whole opening. Playing ...e6 before the bishop escapes is the most common way to accidentally turn a Caro-Kann into a bad French Defense.
- ...c6 was never just a "safe" first move. It was preparing this whole plan. The point of 1...c6 over other first moves is exactly that it lets ...d5 happen with a pawn that isn't easily challenged, which is what makes the rest of this structure so stable. Compare this to defenses where an early ...d5 can be hit immediately by a knight or a pawn. The Caro-Kann sidesteps that entirely by preparing the center break first.
- Meeting h4 with ...h5 is a real, necessary response, not just a matching reflex. It permanently rules out the h5 push that would otherwise force the bishop to make an awkward decision.
- When White plays g4, ...Bg6 is correct. It's not a retreat, it's a repositioning. The bishop stays useful on g6, still eyeing the long diagonal, rather than getting shuffled somewhere passive.
- Development barely changes across all four systems. Because the same core setup (...e6, ...Nd7, ...Ne7 or ...Ngf6) answers System 1 and System 4 almost identically, this repertoire is far less about memorizing four separate openings than it looks on paper.
Who should play the Caro-Kann Advance?
The Caro-Kann Advance is a strong fit for players roughly 800 to 2000 rated, with a style best described as solid and positional. This is not an opening built around early tactical fireworks. It's built around reaching safe, comfortable, well-understood positions where Black's plan is clear and White has to work for any advantage. If you're tired of defenses where one wrong move order leads to a genuinely bad position, the Caro-Kann's reputation as one of the most "problem-free" replies to 1.e4 is well earned.
It's also a strong match if you want a single repertoire that holds up regardless of how your opponent responds. Since all four of White's real systems get met with fundamentally the same plan, you're not relearning a new structure every time someone plays something different against you. That reliability compounds over time too: because the core ideas (bishop out first, ...h5 against h4, ...Bg6 against g4) repeat across so many of the 28 lines here, the tenth line you study reinforces the first nine rather than asking you to hold nine unrelated ideas in your head at once, instead of needing four unrelated systems memorized in parallel from scratch.
It's a weaker fit if you specifically want sharp, unbalanced, high-risk-high-reward positions as your default. While System 3 (4.Nc3 followed by g4) does get genuinely sharp, the overall identity of this opening is safety and soundness first, not maximum chaos.
Common mistakes in the Caro-Kann Advance
- Playing ...e6 before ...Bf5. This is the single most damaging move-order mistake in the entire opening. It locks the bishop behind its own pawn chain for the rest of the game, giving up the exact structural advantage the Caro-Kann is built around.
- Ignoring h4 instead of meeting it with ...h5. Letting White play h5 unopposed forces an awkward, less favorable decision with the bishop that ...h5 was specifically designed to prevent.
- Retreating passively when White plays g4. ...Bg6 is an active repositioning, not a forced retreat. Treat it as the real, correct response this repertoire verifies it to be, not a sign something's gone wrong.
- Trying to memorize four separate openings. Since Black's core plan barely changes across all four of White's systems, treating each one as a totally distinct thing to memorize separately makes this opening look far harder than it actually is.
- Assuming the bishop is safe once you've survived the opening's main tries against it. The Nh4-aiming-at-the-bishop idea shows up in more than one system, sometimes several moves later than you'd expect it. Staying alert to it throughout the game, not just in the first few moves, is part of what this repertoire's depth is actually verifying.
Frequently asked questions
Is the Caro-Kann Advance good for beginners?
It's a strong fit slightly above absolute-beginner level, rated well for roughly 800 to 2000. Its main appeal is safety and soundness rather than simplicity. It rewards understanding one coherent plan more than it rewards raw memorization, which tends to pay off more the longer you play it, not just in your very first few games with it.
What's the most important move in the Caro-Kann Advance?
3...Bf5. Getting the bishop outside the pawn chain before playing ...e6 is the single most important structural decision in the entire opening.
How many different systems does White have against the Caro-Kann Advance?
Four genuinely common ones show up with real frequency in master games: the Short Variation (4.Nf3), the Tal Variation (4.h4), the Shirov Attack (4.Nc3 followed by g4), and the quieter, unnamed 4.Nd2 setup. This repertoire covers all four with one coherent Black plan.
Is the Caro-Kann Advance considered a drawish or boring opening?
Its reputation is for solidity, not passivity. Black gets a genuinely sound, comfortable position in every line, and System 3 in particular (4.Nc3 with g4) can get sharp and tactical. "Solid" here means reliable, not lifeless.
What should Black play if White tries 7.b4 after ...Qa5+?
This is a real, fully covered line in this repertoire, not an unusual surprise. 7.b4!? blocks the check on the a5-e1 diagonal while offering an undefended pawn for faster development, a genuine sacrifice rather than a simple tempo gain, and Black has a specific, verified continuation ready for it rather than needing to work it out over the board.
Why is 3...Bf5 better than just playing ...e6 immediately?
Because the bishop on c8 has no good square left once the pawn structure locks in with ...e6 first. It ends up permanently boxed in behind its own pawns for the rest of the game, the exact same structural problem that gives the French Defense its own reputation for a "bad bishop." Moving it out to f5 first, before that pawn chain closes, solves the problem in a single move rather than living with it for the whole game.
Related openings
- Slav Defense — The exact same strategic philosophy (support the center with a pawn, keep the bishop free) applied against 1.d4 instead of 1.e4, the natural pairing for a complete Black repertoire.
- Caro-Kann Advance (White) — See the same structure from the other side of the board, built from the same real game data, showing how White approaches the exact position you're learning to meet.
Practice every real line against master-game replies, with a plain-English explanation on every move.
Practice Caro-Kann: Advance Variation free →