The Caro-Kann Advance (White): A Complete Guide
The Advance Variation against the Caro-Kann arises after 1.e4 c6 2.d4 d5 3.e5, and it's one of the most direct, principled ways for White to meet the Caro-Kann Defense: rather than resolving the central tension, White pushes forward, gaining real space and locking the structure. This guide covers a complete White repertoire against it, built from the same 61,922 real master games behind this site's Black-side Caro-Kann repertoire. This time it answers both of Black's genuinely common replies from the White side of the board rather than the Black side.
Quick facts
| Moves | 1.e4 c6 2.d4 d5 3.e5 |
| Played as | White |
| Best for | Roughly 900–1800 rated players, especially club and tournament players |
| Style | Solid, positional overall |
| Games analyzed | 61,922 real master games, the same dataset behind this site's Black-side Caro-Kann repertoire, analyzed from White's perspective this time |
| Lines covered here | 25 (across both of Black's genuinely common, real replies) |
What is the Caro-Kann Advance for White?
The Caro-Kann Defense begins 1...c6, preparing ...d5 with a pawn rather than a piece. When White meets 2...d5 with 3.e5, the game enters the Advance Variation, the same underlying philosophy as the Advance Variation against the French Defense, just applied to the Caro-Kann's slightly different pawn structure. Rather than trading the center away, White claims space and asks Black to prove that space can be challenged. This is a genuine trade-off worth understanding rather than just accepting on faith: White gives up the chance to simplify the position early in exchange for territory that has to be actively fought for, not something that resolves on its own as the game continues. Understanding that trade-off is what separates confidently playing this structure from just following moves by rote.
The system taught in this repertoire is the Short System, named for its association with strong grandmaster play, built around calm, natural development: Nf3, Be2, castling, and Nbd2, rather than the sharper tries some White repertoires use to immediately challenge Black's bishop. This is the single most common of White's real approaches in the data, and it reaches genuinely comfortable positions without demanding the sharpest, most theory-heavy continuations.
How to play the Caro-Kann Advance (White): move by move
Every line below starts 1.e4 c6 2.d4 d5 3.e5, and from here the real-game data reveals two genuinely common Black replies, both fully covered.
Black's main reply: 3...Bf5
The single most common continuation, Black gets the bishop out before playing ...e6, described in this repertoire as "the single most important move in the whole Caro-Kann Advance." White continues with the calm, natural plan: 4.Nf3, developing without immediately going after the bishop, followed by 4...e6 5.Be2, "developing quietly, preparing to castle without committing to anything sharp." From here, Black has three genuinely common ways to continue, each covered in full:
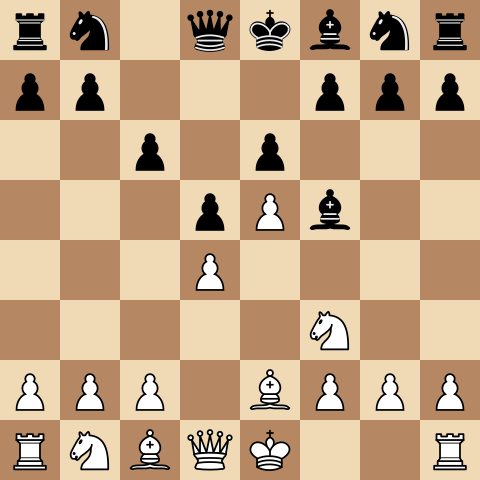
- 5...Nd7, developing naturally toward a flexible setup. After White castles, Black's follow-ups here include the useful preventive ...h6 (ruling out any future Ng5 or Bg5 tricks before they matter) and the safe bishop retreat ...Bg6 rather than risking an unfavorable trade.
- 5...Nge7, completing development and preparing to castle.
- 5...c5, striking directly at White's center now that development allows it. White meets this with 6.Be3, developing actively and adding support to d4. Black's most tested reply here is 6...Qb6, "eyeing b2 and adding pressure on d4 at the same time," though worth knowing precisely: the b2 threat is real and immediate (the b-file is genuinely open), while the pressure on d4 is latent rather than active, since Black's own c5 pawn sits directly on the diagonal between the queen and that square. White continues with 7.Nc3, developing naturally, and Black has real choices here: the calm ...Nc6, the space-gaining ...c4 (locking the queenside structure in exchange for releasing the central tension), or the sharp ...Qxb2, grabbing the b2 pawn in a genuinely sharp position that this repertoire flags with its own "!?", a real, playable try, not a refuted blunder.
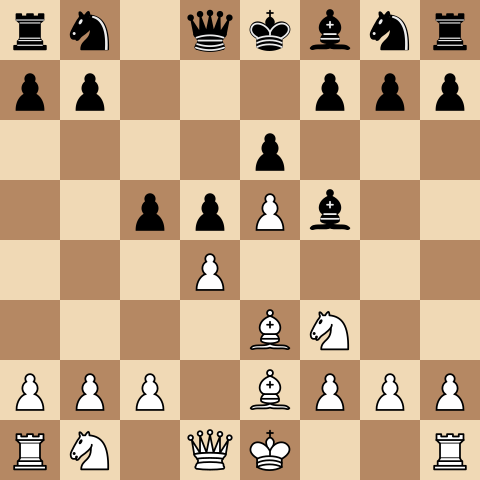
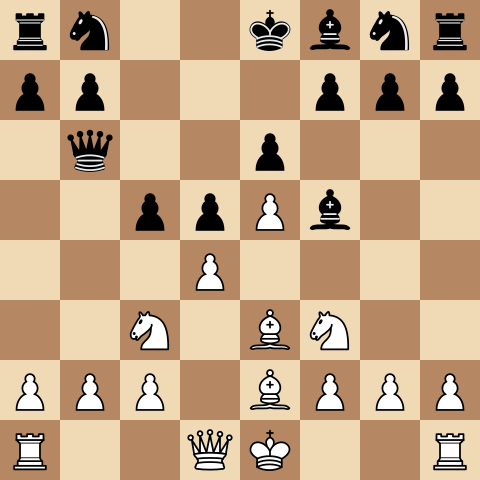
It's worth knowing precisely why White is willing to let this pawn go: this isn't a case of hoping for vague, generic compensation. After 7...Qxb2, White has two real, verified resources, and one of them is a genuinely concrete tactic worth knowing cold. 8.Nb5! threatens 9.Nc7+, and that check isn't just an inconvenience for Black, it's a real royal fork: the knight lands with check on the king while simultaneously attacking the rook sitting on a8, a devastating threat Black has to take seriously immediately. The other option, 8.Bd2, looks quieter but is solving a real problem of its own: at this exact point the knight on c3 is completely undefended, and Black's queen on b2 is one move from grabbing it with check via ...Qxc3+. Bd2 covers that square and finishes development in one move, taking Black's follow-up threat off the table entirely. Either way, White isn't simply hoping the extra activity works out, both replies meet a real, specific problem Black's queen grab creates.
Black's alternative reply: 3...c5, the Arkell/Khenkin Variation
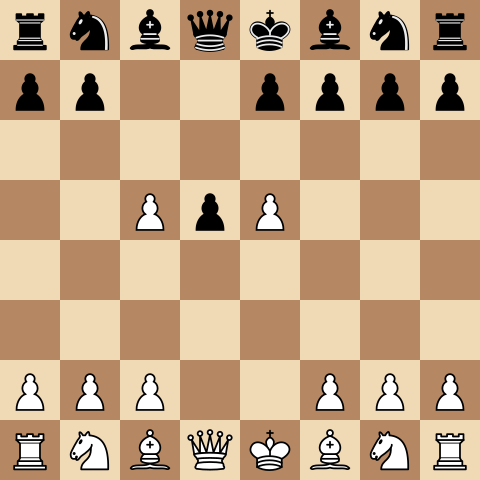
Rather than developing the bishop first, Black strikes directly at the base of White's pawn chain immediately, a real, named try known as the Arkell/Khenkin Variation. White's response is simple and concrete: 4.dxc5, "simply taking the pawn, a real, concrete way to meet Black's immediate central strike." From here, Black has two main recapture methods in the data: 4...e6, preparing to win the pawn back through natural development, or 4...Nc6, developing first and recapturing later. Both lead to positions with real, distinct theory of their own, including a further branch in the ...e6 lines between recapturing actively with ...Bxc5 or continuing to develop with ...Nc6/...Nd7 first. This whole plan is worth knowing precisely because it's genuinely simpler than it might look on paper. White isn't trying to hold onto the extra pawn forever, just to take it cleanly and let Black spend real time and moves winning it back, time that could otherwise have gone toward development or central control.
Strategic ideas in the Caro-Kann Advance for White
A handful of ideas repeat across both of Black's replies, and recognizing them explicitly is worth more than treating each of the 25 lines here as a separate thing to memorize on its own:
- e5 is a space-grabbing decision, not a passive one. Locking the structure with an advance rather than trading it off is a genuinely aggressive strategic choice, claiming territory Black has to actively work to challenge.
- The Short System's calm development (Nf3, Be2, O-O, Nbd2) doesn't need to attack the bishop immediately to be effective. Some White systems go straight after Black's bishop on f5; this one simply develops naturally and lets the space advantage do the work over time.
- Recognize the difference between an immediate threat and latent pressure. Black's ...Qb6 genuinely threatens b2 right away, but the d4 pressure stays latent until the c5 pawn moves out of the way. Treating both as equally urgent can lead to unnecessary, premature concessions.
- dxc5 is a simple, concrete answer to Black's alternative plan. When Black strikes immediately with 3...c5 instead of developing the bishop first, there's no need to overthink it, just take the pawn and let Black spend time winning it back.
- The two branches (3...Bf5 and 3...c5) call for genuinely different responses, not one universal reaction. Against the bishop-development plan, the whole approach is calm, natural development. Against the immediate central strike, it's a direct, concrete capture. Recognizing which plan Black has actually chosen matters more than having one fixed reaction to everything, since applying the wrong plan's response to the other branch wastes real time.
Who should play the Caro-Kann Advance (White)?
This repertoire is a strong fit for players roughly 900 to 1800 rated, with a style best described as solid and positional. If you're looking for a direct, principled way to meet the Caro-Kann that doesn't require memorizing the sharpest tactical tries against Black's bishop, the Short System offers a genuinely sound, space-based plan built on natural development rather than forcing lines, and it holds up well against both of Black's genuinely common replies rather than only one of them.
It's also a strong match if you already play the Advance Variation against the French Defense. Both repertoires share the same underlying idea of claiming space with an early pawn push rather than resolving central tension immediately, and the pattern-recognition from one carries directly into the other. That overlap extends to the specific skill of distinguishing real threats from latent pressure too, since both repertoires include moments where an opponent's piece looks more active than it actually is until a pawn tension resolves.
It's a weaker fit if you specifically want to challenge Black's light-squared bishop immediately and force an early structural decision. Other White systems against the Caro-Kann Advance go straight after that bishop, at the cost of more forcing, more theory-heavy lines than the calm approach covered here. Both are legitimate ways to play this position; the Short System simply trades some immediate sharpness for a lower overall preparation burden.
Common mistakes in the Caro-Kann Advance (White)
- Trading the center away instead of pushing with e5. This gives up the entire structural point of the Advance Variation. The space gained by pushing forward is the whole plan, and reverting to a trade-based approach forfeits it for nothing in return.
- Rushing to attack Black's bishop instead of developing naturally. The Short System's whole appeal is that it doesn't need to immediately challenge the bishop on f5 to be effective. Trying to force the issue early abandons the calm, low-theory approach for no real gain.
- Treating Black's ...Qb6 as a single unified threat. The b2 pawn is genuinely hanging if left undefended, but the d4 pressure isn't live yet, Black's own c5 pawn is still in the way. React to each accurately rather than assuming both are equally urgent, which can lead to unnecessary defensive moves that cost real time.
- Overthinking the response to 3...c5. Simply taking with dxc5 is a real, principled answer. There's no need to find something more complicated when the straightforward capture works, and searching for a cleverer alternative can waste time better spent developing.
Frequently asked questions
Is the Caro-Kann Advance good for White beginners?
It's a strong fit slightly above absolute-beginner level, rated well for roughly 900 to 1800. Its appeal is a clear, principled plan built on natural development rather than forcing tactics, making it genuinely learnable without heavy memorization, and the same core plan (calm development, then react to whichever of Black's two main tries actually shows up) covers the large majority of what you'll actually face in real games.
What is the Short System in the Caro-Kann Advance?
It's the calm, natural development plan covered in this repertoire, Nf3, Be2, castling, and Nbd2, rather than immediately challenging Black's light-squared bishop. It's the single most common of White's real approaches in the data, and it doesn't require the deepest, most theory-heavy preparation to play well.
How should White meet 3...c5 in the Caro-Kann Advance?
Simply capture with 4.dxc5. This is a direct, concrete answer to Black's immediate central strike, known as the Arkell/Khenkin Variation, rather than something requiring a more complicated response, and it lets White focus subsequent moves on development rather than defending a pawn under pressure.
Is the Caro-Kann Advance for White the same idea as the French Advance?
Yes, philosophically, both claim space with an early central pawn push rather than resolving the tension immediately. The pattern-recognition (grab space, defend the center, let the structure do the work) carries directly between the two repertoires.
Why does this repertoire recommend the Short System instead of directly attacking Black's bishop?
Because it's the single most common of White's real approaches in the actual game data, and it reaches genuinely comfortable, well-tested positions without demanding the sharpest, most memorization-heavy continuations. Directly challenging the bishop is a real, playable alternative, but it comes with a steeper theoretical cost than the calm development plan covered here, which is exactly the trade-off worth knowing about before choosing between the two.
Is White's pressure on d4 in the ...Qb6 lines real or just theoretical?
It's real, but not immediate, the same latent-versus-live distinction covered above. Black's queen eyes the b6-d4 diagonal, but the c5 pawn is still sitting on it. The b2 threat, by contrast, is completely unobstructed and needs to be taken seriously right away.
Related openings
- French Defense: Advance Variation — The exact same strategic philosophy (grab space, lock the structure) applied against the French Defense instead of the Caro-Kann, learn one, and the other follows naturally.
- Caro-Kann Advance (Black) — See the same structure from Black's perspective, built from the same real game data, useful for understanding exactly what your opponents are taught to do against you.
Practice every real line against master-game replies, with a plain-English explanation on every move.
Practice Caro-Kann Advance (White) free →