The Nimzo-Indian Defense: A Complete Guide
The Nimzo-Indian Defense arises after 1.d4 Nf6 2.c4 e6 3.Nc3 Bb4. It's one of the most respected, most classical defenses in chess. Rather than contesting the center with a pawn, Black pins White's knight immediately, fighting for e4 with a piece instead. This guide covers a complete Black repertoire, built from 77,290 real games across five combined datasets, answering all five of White's genuinely major systems.
Quick facts
| Moves | 1.d4 Nf6 2.c4 e6 3.Nc3 Bb4 |
| Played as | Black |
| Best for | Roughly 1400–2200 rated players |
| Style | Positional |
| Games analyzed | 77,290 real games across five combined datasets |
| Lines covered here | 27 (across all five major White systems) |
What is the Nimzo-Indian Defense?
Most defenses to 1.d4 contest the center with a pawn. The Nimzo-Indian does something different: 3...Bb4 pins White's knight on c3 to the king. Rather than fighting for the e4 square with a pawn, Black fights for it with a piece, keeping the option of a pawn structure that's flexible rather than committed this early.
This piece-first approach to the center is exactly what gives the Nimzo-Indian its lasting reputation as one of the most sound, most deeply respected replies to 1.d4. It doesn't concede anything structurally in exchange for its solidity. Real, elite-level chess has been built around this exact idea for the better part of a century.
How to play the Nimzo-Indian Defense: move by move
Every line below starts 1.d4 Nf6 2.c4 e6 3.Nc3 Bb4. From here, White has five genuinely major systems in the real-game data, and this repertoire answers all five with one coherent underlying plan.
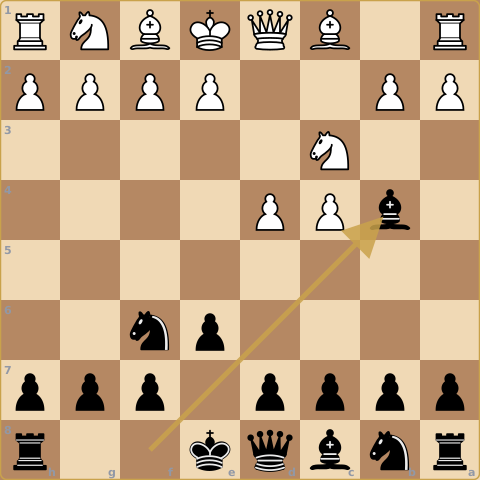
The Rubinstein System: 4.e3
The single most common response, a quiet, flexible move that supports d4 and keeps every future plan open, rather than committing to a specific structure right away. Black responds simply: 4...O-O, castling into safety before deciding on a central plan. White typically continues with either 5.Nge2 (keeping the option of recapturing on c3 with the knight rather than a pawn, if the bishop ever trades itself off) or 5.Bd3 (developing the bishop actively toward the kingside), both real, common tries fully covered in this repertoire.
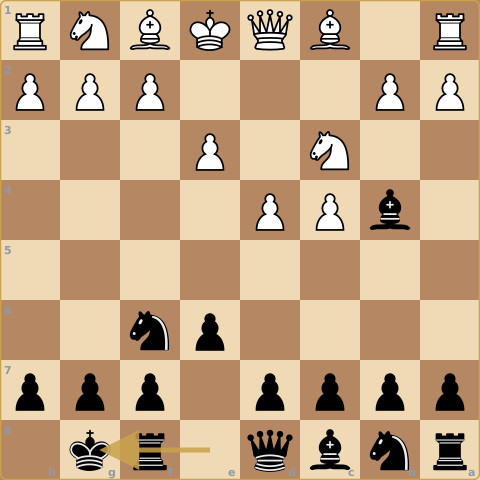
The Classical Variation: 4.Qc2
White brings the queen out immediately, "prevents doubled pawns entirely, since the queen can recapture on c3 instead of a pawn" if the bishop ever takes the knight. Black meets this the same way: 4...O-O, castling into safety before committing to a specific central plan, keeping the position flexible regardless of which system White has chosen.
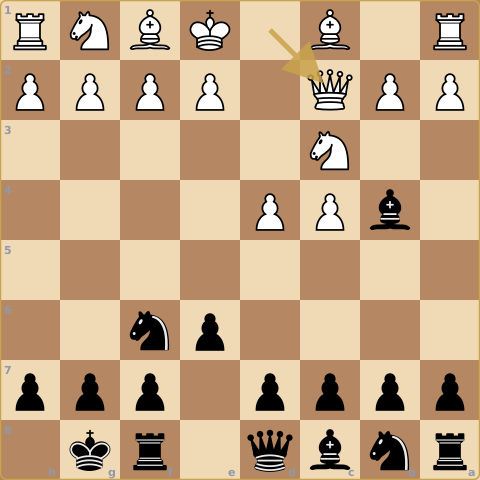
White's flexible try: 4.Nf3
Rather than committing to a specific plan against the bishop, White simply develops the other knight, "a natural, common alternative" that often transposes into structures resembling the other systems. Black continues naturally: 4...O-O, the same reliable response that works across nearly every one of White's approaches.
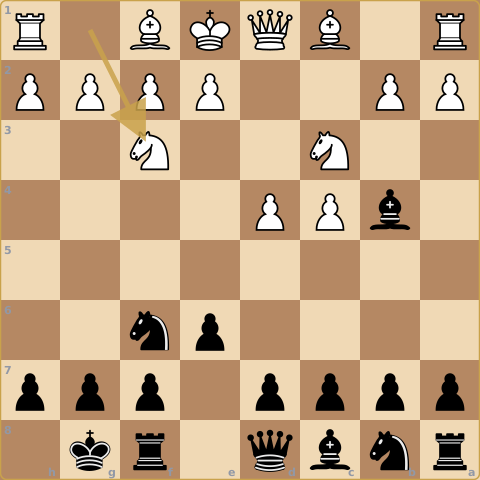
The Saemisch Variation: 4.a3
The most direct, confrontational try, a3 "forces the bishop's hand immediately, accepting doubled pawns for both bishops plus a broad center." Since the bishop has nowhere useful to retreat to yet this early, Black's real, principled response is 4...Bxc3+, taking the knight with check rather than retreating. White recaptures with 5.bxc3, accepting the doubled pawns in exchange for the bishop pair and a broad center, a real, well-understood structural trade that both sides play for specific, well-documented reasons.
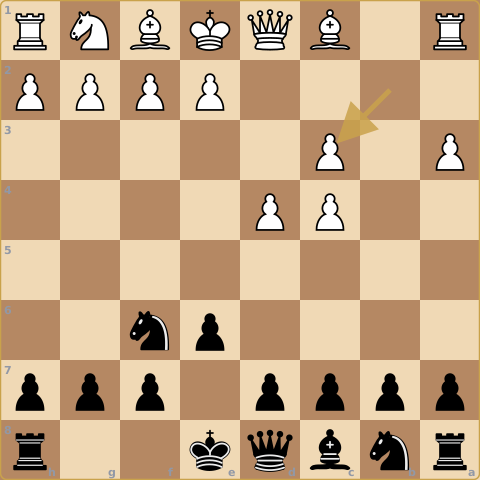
Black's follow-up plan from here is concrete, not just "the structure is bad for White and something will turn up." The doubled c-pawns give Black a specific target: the pawn on c4, which the c3-pawn behind it can't defend. The typical sequence is ...c5, fixing White's structure in place, then ...b6 and ...Ba6, aiming the bishop straight at c4, and ...Nc6-a5, repositioning the knight to blockade and attack that same pawn. Piled up enough times, that pressure can turn White's extra central space into a long-term weakness rather than an asset.
Strategic ideas in the Nimzo-Indian Defense
A handful of ideas repeat across all five of White's systems:
- The pin on c3 is real, and White plans around it from the start. Since the bishop pins the knight to the king, White often looks to trade it off cleanly or prepares to recapture with something other than a pawn if it's ever exchanged.
- ...O-O is Black's reliable answer across nearly every system. Rather than reacting differently to each of White's five approaches, castling into safety and keeping the position flexible works as the natural response in the large majority of real lines.
- The Saemisch's doubled pawns are a real, deliberate trade, not damage to be avoided at all costs. White accepts a genuine structural weakness in exchange for the bishop pair and a broad center, understanding why that trade is considered worthwhile matters more than treating doubled pawns as an automatic advantage for Black.
- Which system White chooses genuinely changes the resulting structure. The quiet Rubinstein, the queen-first Classical, the flexible Nf3, and the confrontational Saemisch lead to real, different kinds of middlegames, which is why this repertoire treats each one as its own real subject.
- Fighting for the center with a piece rather than a pawn keeps real structural flexibility. Black hasn't committed to a specific pawn structure by move three, which is exactly what gives this opening its reputation for soundness across such a wide range of resulting positions.
Who should play the Nimzo-Indian Defense?
The Nimzo-Indian Defense is a strong fit for players roughly 1400 to 2200 rated, with a style best described as positional. If you want one of the most historically respected, most thoroughly tested ways to meet 1.d4, an opening that fights for the center with genuine flexibility rather than an early structural commitment, the Nimzo-Indian is about as sound a choice as exists against 1.d4.
It's also a strong match if you value understanding pawn structures and long-term positional themes (like the Saemisch's doubled-pawns trade-off) over memorizing forced tactical sequences, this repertoire rewards genuine positional understanding across all five of White's systems.
It's a weaker fit if you specifically want the sharpest, most immediately tactical way to meet 1.d4, while the Nimzo-Indian has real tactical resources depending on which system White chooses, its overall identity is structural soundness, not an early forcing fight.
White can dodge this entirely by playing 3.Nf3 instead of 3.Nc3, and it's common enough that you need an answer ready. The Bogo-Indian Defense gives you one: the bishop still checks on b4, because there's no knight on c3 to block it. The Queen's Indian Defense is the other main reply to 3.Nf3, fianchettoing instead of checking. Most players learn the Nimzo with one of these two as its companion rather than as a separate opening.
Common mistakes in the Nimzo-Indian Defense
- Assuming the pin on c3 carries over to every similar-looking position. It's genuinely a pin here, but not every position where a bishop sits on b4 works the same way, so it's worth confirming rather than assuming on sight.
- Treating all five of White's systems as requiring the same response. The Rubinstein, Classical, 4.Nf3, Saemisch, and Leningrad/Keres setups are genuinely different plans, knowing which one is actually on the board matters more than having one fixed reaction ready for all of them.
- Avoiding the doubled pawns in the Saemisch out of instinct. Playing 4...Bxc3+ and accepting White's structural trade is the real, principled response here, not a concession, retreating the bishop instead gives up a real, well-tested plan for no clear benefit.
- Delaying castling to look for something more ambitious. Across nearly every one of White's five systems, ...O-O is the reliable, well-tested response, searching for something sharper instead often just gives up tempo without real compensation.
Frequently asked questions
Is the Nimzo-Indian Defense good for beginners?
It's a strong fit slightly above absolute-beginner level, rated well for roughly 1400 to 2200. Its appeal is genuine structural soundness and flexibility rather than sharp forced tactics, though understanding why each of White's five systems calls for the response it does rewards some existing positional foundation.
Does 3...Bb4 really pin White's knight?
Yes. Capturing on c3 would expose White's king to check, so the pin is genuine from the very first moves of the opening, not just an aggressive-looking placement.
How many different systems does White have against the Nimzo-Indian?
Five genuinely major ones show up with real frequency in the data behind this repertoire: the Rubinstein System (4.e3), the Classical Variation (4.Qc2), the flexible 4.Nf3, the confrontational Saemisch Variation (4.a3), and the Leningrad Variation (4.Bg5) / Keres System (4.f3). This repertoire's core plan applies against all five, with the deepest move-by-move coverage on the four systems detailed above.
Why does White accept doubled pawns in the Saemisch Variation?
In exchange for the bishop pair and a broad, strong pawn center. It's a real, deliberate structural trade rather than an unforced weakness. Both sides play for specific, well-understood reasons, and Black's own response (4...Bxc3+) is the principled way to bring about exactly this trade-off.
Is castling always the right response to White's systems in the Nimzo-Indian?
In the large majority of real lines, yes. ...O-O works as Black's reliable answer across the Rubinstein, Classical, and 4.Nf3 systems. The Saemisch is the real exception, where Black's principled response is 4...Bxc3+ instead, since White's a3 directly challenges the bishop before castling becomes the priority.
Practice every real line against master-game replies, with a plain-English explanation on every move.
Practice Nimzo-Indian Defense free →